Friday, March 15, 2013

Friday- Washi tape magnets


Hi everybody! Today's tutorial is really versatile so feel free to put your own spin on it.

You'll need
-sticky magnet roll
-washi tape in as many types as you want magnets
-scissors
-paper (optional)
-ball point pen

First things first, cut a square shaped piece of the roll, then trace the shape of the magnet you want to make and then cut it out.

Stick the shape on the tape, and cut around. If the magnet you have has a sticky side, you can also use craft paper.

There you have it! A cute magnet you can use on your fridge or locker.


Thursday, March 14, 2013

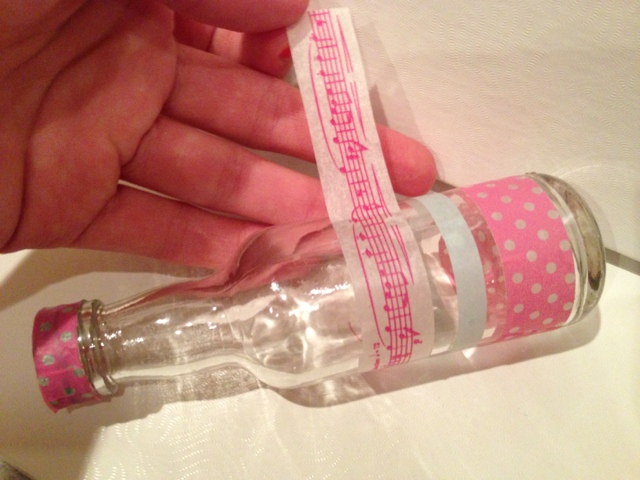
Thursday- Washi tape bottles

Hi everyone, today's tutorial is again simple, but cute. It's less for use, than for display. These would be cute in a craft room, or even to store little things. It's a bit like the boxes we made a few days ago


You'll need
- washi tape
-small bottles (mine were from samples of olive oil)
-scissors

The first thing to do once again is to choose the tape. I suggest finding a few for each bottle (3 approx.) that look nice together.


Then wrap it around the bottle and cut it once it's gone all the way around.


Doing the cap is a bit tricky, but I traced the top and wrapped the sides, and cut all the excess tape. It will vary so just do what you can. Otherwise, you can easily paint it.

Voila!! Happy Thursday!
Xox Luvely stitches


Wednesday, March 13, 2013

Wednesday- Washi tape clothespins

Another super easy tutorial today, but equally adorable.

You'll need,
-plain wooden clothespins
-an assortment of washi tape
-a board you can use an Xacto knife on (optional)
-scissors or an Xacto knife

First, lay your piece of tape over one side of clothespin.

Then cut around the peg so that there are no bits of overhanging tape.

Ta-Da!! Now make a whole bunch!

Xox Luvely Stitches


Tuesday, March 12, 2013

Tuesday- DIY stamped washi tape

Hi again everyone! Today we're making something amaaaaazing! I love this, but it takes perseverance.


You'll need:
-washi tape, nothing too flashy or metallic
-scissors
-rubber stamps
-an ink pad

You want to do this project on a surface that you don't mind messing up a bit, trust me, you'll probably get ink on it.

Lay out your tape. For your first time, don't use a tape that you're too fond of. Chances are, your first one will not be spectacular, mine certainly wasn't.

Stamp your stamps onto the tape. This may not work the way you want it to the first time, but don't get too discouraged. It happens.

At this point, just leave it to dry. But be very careful with it, because I ALWAYS end up smudging mine. Try not to make my mistake.

There you have it! One of a kind washi tape!!You can use all kinds of tape and stamps, and make a  whoole bunch

Xox Luvely Stitches


Monday, March 11, 2013

Monday- Washi tape boxes

Hello crafters! Today, we're making super simple washi tape boxes with simple things you have around the house. You know those little brown boxes you get a new piece of jewelry in, well it's time to re- purpose them into cute gift boxes or trinket boxes.


All you need is:
-various washi tapes in different colors and thicknesses
-boxes
-scissors

This is super easy. The hardest part is really to figure out what tape you want to use. But once you've made you decision, just take the beginning of the tape and put it under the the rim of the box . Then stretch it over the box until the other side, then tuck it under the other side and stick it down firmly.


Do this with as many stripes of tape as you want to, until you have the look you want.

You can choose tape based on what you'll put in it, like a kind of label.


There you have it! The simplest tutorial there is!
Xox
Luvely stitches

P.S. If you have any ideas for tutorials or want me to do any themed posts, PLEASE let me know, I love hearing your feedback


Sunday, March 10, 2013

March break: washi week

It's finally here, a week of relaxation and free time! What to do...? Craft! This week, luvely stitches is bringing you a DIY a day, to fill your time with crafting goodness, to end washi winter. So tune in from Monday to Friday for your daily dose of luveliness!!
Xox Luvely stitches

Friday, February 1, 2013

Day 2 of washi winter: Bunting


Hello again everyone!
Today to continue my washi tape tutorials, I'll be showing you how to make one of my favorite decorative items. Bunting!! I love this stuff, you can put it just about anywhere and it adds a perfect touch of color.


 Mine is 76cm (I put the tape about every half an inch and used 26 triangles) but feel free to modify it. I suggest figuring out how long you want it to be before starting, keeping in mind that the thread should be slight longer than the length of whatever you're hanging it on, as it hangs down in the middle. Also, I used four colors for mine, but you can use however many you want.

Here's what you'll need:
- a piece of thick paper in a color different from your tape
-scissors
-a pencil
- 76cm of thread in the color of your choice 
-20cm of 4 kinds of washi tape (in colors that go well together)

The first thing to do is to make your template. On the thick paper (this is essential so that it doesn't rip and is easy to trace) use a ruler to measure a 1.7 by 3.8cm rectangle and then trace it. I suggest to draw it in the corner so that you only have to draw two lines. Then, make dots in the in the middle of the lines you drew and the edges of the paper. Next just connect the dots and make a diamond shape, then cut it out.


You can fold it over to see what it will look like when the bunting is done. If you don't like the shape, just cut off little bits until you get the shape you want, just not too much or the next step won't work properly.


Next, you'll need to get out your washi tape. Measure the washi tape and cut it. Stick it lightly onto a clipboard or other flat surface.


Angle your diamond so that the sides are lined up with the edges of the tape. Next, trace the other with a pencil, lightly. For my bunting, I needed about 7 of each color but once again, you may need to alter it. For a 30 inch bunting, trace 26 diamonds in whatever colors you're using.


When you're done, cut out the pieces. You can stick them on the edge of a table until you're ready to use them.


Now it's time to cut your thread. Take whatever thread you're using and cut it to 76cm (or the size you want), it should be more than the whatever you're hanging it on as it should hang down a bit in the middle. As they say, mesure twice, cut once. 

This is where your bunting starts to take shape. What you want to do is to line up the thread with two corners on the sides like this


Then fold it over by connecting the top and bottom corners.

Continue doing this, spacing out the triangles by about a 1cm apart until you get to the end of the thread. Et voila! Your bunting is finished! All there is to do now is hang it up and admire your work.

Xoxo
Luvely stitches


Monday, January 7, 2013

Day 1 of washi winter, washi tape charger


Day 1 of washi winter

Hi again!
Well today's the day, My very first tutorial! I wanted it to be something that everyone can do, and should be helpful to everyone. As you know, today almost everyone has a smartphone or even a cellphone and that means a cellphone charger, which look, in my opinion, boring. Which means... Washi tape time!

                                    
What you will need:
- washi tape of your choice
- charger and plug
- scissors or X-acto knife
- non marking board
- pencil (optional)
-clear tape (optional)

As I'm doing this specifically for the iPhone charger and plug, you'll have to alter it if you're doing this for any other type of charger. 

The first step is to cut the tape. You'll need to cut one piece 0.8/6 cm, two 10/1.5cm and  one 1.5/4.5cm. If you're using scissors, use a pencil to mark where you have to cut. 


Voilà!

 Next, wrap! Just stick the tape in the back and wrap it around. Stick the tape down with clear tape so that it lasts longer (this step is optional) 


All done! 
There you have it, a cute personalized charger. I'd love to get your input on this, and email me pictures of new chargers!!
Xoxo
Luvely Stitches


Tuesday, January 1, 2013

Welcome to 2013/ Washi winter

Hello my dear readers!! It's a new year, a perfect time for new beginnings. I have decided to take this blog in a new direction. Not only will it be somewhere where I can show all of you my creations, but it will be a place where you can try some out for yourselves. I'll share my favorite crafts, techniques and patterns that you can follow or alter to suit your style and preference. This winter, I'll be showing you some of my favorite crafts to do with washi tape.


There's so much you can do with it, and so many colors and patterns so you can always find something you like that will inspire you to make something. If you're a brand new crafter or new to washi tape, I recommend to get a mixture of solid colors and patterns, that have similar colors or colors that go well together. Also, if you like a variety of thicknesses. The standard size is about 1.5 cm but there are also thinner ones that are just over 0.5 cm. If you get mostly thicker ones and a few of the thinner ones in solid colors, you have an endless amount of possibilities for mixing and matching. There are even thicker ones (3.5 cm) but in my opinion you really don't need many rolls of this. If you're looking to buy washi tape, I highly recommend Etsy. They have a huge amount of tape, in every color and pattern you could imagine. It's pretty reasonably priced and you can get sampler sets so that you know what kinds of tape you like to use. I've also been sucessful finding washi tape in a craft or paper store. Personally, one of my favorite brands is MT, they have good quality tape in a variety of colors and great sets, but it's really up to you. You'll soon see that it's great for just about everything. From gift wrapping to decor to just jazzing up anything that's looking a little plain. Good bye for now, and I look forward to hearing your feedback on my very first tutorial...! Luvely Stitches

Saturday, July 28, 2012

California...!

Guess where I am? We've been traveling through northern California and I'm absolutely loving it! This is a trip that I've been looking forward to for a long time and this may sound strange, but I find it cool to be in state that inspired one of my favorite songs and by far my favorite music video. What, might you ask is the song I am referring to... California gurls by Katy Perry!


Who is my brand new inspiration!! I really admire her confidence and how she embraces what makes her different. So, I decided that I would try to whip up a few felt goodies inspired by Katy's amazing music video (of California gurls)! That's right... Cupcakes, lollipops, cotton candy clouds and gummy bears! If you haven't seen the music video... Here's the link, go and WATCH IT!
Hope everybody's summer is going great...
xoxo Luvely Stitches

Monday, July 9, 2012

My heart sings for singer!

My darling best friend has shown me the most AMAZING THING! A VINTAGE SINGER
SEWING MACHINE! (Here it is!!!)


As I am sure you have noticed by now, I am extremely jealous, it had this
little sewing table and after flipping bits of it up and down and then
pulling it out, it becomes this darling little machine! Since she's shown it
to me , every time I go to her house, I stare longingly at it but don't get
me wrong, my little sewing machine is still one of my favorite things. I
just love how vintagey (and green!) it is.

This trusty little Husqvarna has been in the family for 3 generations.
Lately I just use it for decoration and little drawstring bags but, when my
mom was young, most of her clothes were made on it, even her prom dress!
Isn't that cool?! I wish I could make clothes, but my sewing ability is kinda
limited to smaller things. One of these days I should get my awesome grandma
to teach me. She's a really amazing seamstress.
Love you babi! Xoxoxo

Luv, Luvely Stitches <3

Tuesday, May 15, 2012

Luvely stitches has gone international!


Helloo! Oh my goodness!
Just a few days ago I popped this luvely little package in the mail (pic below) and guess where it was headed? Jolly ol' England! So folks, it's official! Luvely stitches has travelled across an ocean!!!


Woo hoo! (Sorry the stuffies are a bit slanted, once they went into the bag, it was hard to keep them straight) Anyway, I'm finishing another order for the store, I better go...too de loo...
xoxo Luvely Stitches <3

Sunday, May 6, 2012

Craft Fair

 Hello sweetie pies!
Guess what? I participated in my very first craft fair! It was with city of craft  and a great big thanks to all of you who came out to support me, it was a great success. It was an amazing experience and I really hope it's something I can do again.Here's a picture of my booth...

 Hope you're all enjoying the either warmer (or colder) whether! Depending on which hemisphere you're on right now...
Lots of love,
Luvely stitches <3

Tuesday, March 20, 2012

100 Mile Child

Dearest readers,

Today I noticed the absence of something quite important in the Luvely stitches world, 100 Mile Child! It's a really nice store on Danforth (Toronto) where my selling adventures have started. They sell a bunch of locally made and generally ADORABLE stuff there. At the store I have: buttons, drawstring bags, felt rings, I had Xmas ornaments and soon some fruit and veg!! Below is a photo of my most recent buttons.


Check it out if you're in town, or shoot me an email (Luvelystitches@gmail.com) if you're interested in anything! I'd be more than happy to pop it in the mail!

Anyway,
Have a wonderful week,

Luv,

Mademoiselle stitches
P.S. Just trying that out, what do we think?

Sunday, March 11, 2012

Bruce the Koala

Hello my darlings!

How has your spring been going? Mine is kinda normal, you know, wet and hopeful. I've realized that I haven't shown you my darling little koala. He was one of my first original patterns and one of my favorite stuffies. Actually they're all my favorites, but he's particularly special to me because he reminds me of my amazing time in Australia. I was there and in new zealand a while ago and it was really amazing, I was so inspired by not only the beautiful scenery, but by my kindred spirit/my dad's cousins wife. She is an incredible seamstress and an amazing person, who makes an honestly mouth watering mince pie. Hope you luv my little koala as much as I do!

xox

Luv, Luvely Stitches

Sunday, January 8, 2012

Resolutions


Hello my darling readers!
Do you have any new year's resolutions? I know I do. One in particular is more a promise than resolution. I promise to write 1 blog post a week (starting now, lol whoops...). You all know how much trouble I have updating you all on my various creations. But this year, all of that will change. My friends here on the blogosphere will be 100% in the know. Now, on a differant note, here is yet another something to put in your hair, but this time, an elastic. And, i do believe that this is the first time I've shown you anything I've done with proper fabric, how exiting!


These are super cute and I just love the pattern of the fabric. Anyway, hope you're looking forward to the rest of this year as much as I am!

Lots of love,

xox Luvely Stitches <3


Thursday, November 17, 2011

Fluffy Cupcake

Ask yourself: what is better than a pink cupcake? Well, I think I've finally found the answer. A FLUFFY pink cupcake. A new needle felted hair pin just joined the collection. I could just eat it up (but don't worry, I won't)

LuvelyStitches <3 xoxo


Thursday, November 10, 2011

Cake!


Hello again!
Once in a while, everyone needs a little pick me up. A little sugar, maybe? I sure hope so...
This banana, chocolate vanilla and creamy lemon trio was a definite hit at a kids' sewing workshop a few months ago at "Advice from a cattarpillar". Though 3D projects do pose a bit of a challenge, it is 100% worth it!
I hope you love them!
Luvely Stitches <3

Saturday, October 1, 2011

Little wooly things

Hello again readers,
Am I the only one who needs to have a few new little wooly things as the weather gets colder?
Well, lately, I have taken to needle felting, this is my newest little creation;


Hope you like it!
Luvely Stitches
P.S. Check out my flickr page

An autumn surprise

Hello to all of my luvely followers and first time readers. As the chilly autumn breeze is coming our way, I have a little surprise that I hope you'll enjoy.
I am very excited to unveil my new logo!


As of today, it is up on my etsy site, so please comment and tell me what you think, I'm always thrilled to get feedback,
Happy autumn!
Luvely Stitches
P.S. Many thanks to my wonderful and talented mystery designer